
DUOPRO 151 161 171 - Bluetooth Headset PLANTRONICS - Free user manual and instructions
Find the device manual for free DUOPRO 151 161 171 PLANTRONICS in PDF.

| Product Type | Wired headset for telephone |
| Brand | Plantronics |
| Models | DuoPro 151 (earhook), 161 (headband), 171 (convertible) |
| Microphone Type | Noise-canceling or voice tube |
| Connectivity | Connection cord with Quick Disconnect™ plug |
| Compatibility | Telephone or amplifier |
| Ear Placement | Right or left (adjustable) |
| Included Accessories | Earbud, stabilizers, clothing clip, headband or earhook depending on model |
| Warranty | 2 years |
| Recommended Maintenance | Monthly cleaning with a damp cloth; replace earbud and voice tube every 6 months |
| Available Spare Parts | Earhook, foam earbud, headband, voice tube |
| Repairability | Repair at an authorized Plantronics service center |
| Weight | Approximately 20-30 g (estimate) |
| Cable Length | Approximately 1.5 m (estimate) |
Frequently Asked Questions - DUOPRO 151 161 171 PLANTRONICS
User questions about DUOPRO 151 161 171 PLANTRONICS
0 question about this device. Answer the ones you know or ask your own.
Ask a new question about this device
Download the instructions for your Bluetooth Headset in PDF format for free! Find your manual DUOPRO 151 161 171 - PLANTRONICS and take your electronic device back in hand. On this page are published all the documents necessary for the use of your device. DUOPRO 151 161 171 by PLANTRONICS.
USER MANUAL DUOPRO 151 161 171 PLANTRONICS
Hoofddorp, The Netherlands
Tel: (0)0800 PLANTRONICS
0800 7526876 (NL)
00800 75268766 (BE/LUX)
Plantronics Sarl
Noisy-le-Grand, France
No Indigo: 0825 0825 99
+33 141674141
Plantronics GmbH
Hürth, Germany
Tel: 0800 9323400
+4922333990
Plantronics Acoustics Italia Srl
Milan, Italy
Numero Verde: 800 950934
+39029511900
Plantronics Iberia, S.L.
Madrid, Spain
Tel: 902 41 51 91
+34916404744
Plantronics MEEA Sales Region
London, UK
Tel: +44 208 349 3579
Nordic Region
Finland 0923306820
Sverige 031289200
Danmark 44 35 05 35
Norge 23173770
Plantronics Ltd, Interface Business Park, Bincknoll Lane, Wootton Bassett, Wiltshire SN4 8QQ. ENGLAND
www.plantronics.com/emea
C E

PLANTRONICS
DUOPRO™ HEADSET
User Guide
Benutzerhinweise
Brugsanvising
Manual del usuario
Plantronics 2 year Warranty and Repair Service
UK Products under warranty are replaced free of charge.
All units serviced to full production standards using original factory parts. 0800 410014
Thank you for selecting the DuoPro Headset from Plantronics.
The DuoPro range comprises of:
Model 151 - Over-the-ear headset
Model 161 - Over-the-head headset
Model 171 - Convertible headset (over-the-head or over-the-ear)
All styles are available either with a noise-cancelling microphone or voice tube. Polaris models are also available.
This user guide provides instructions on the assembly and usage of your headset.
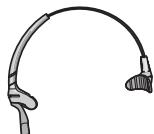
DIAGRAM KEY
1 Adjustable Headband
2 Stabiliser Bars
3 Receiver
4 Ear Cushion
5 Headset Cable
6 Noise-Cancelling Microphone Boom
7 Voice Tube Boom
8 Pivot Pin
9 Pivot Pin Holder
10 Cable Stabiliser Channel
11 Earloop
12 Earloop Cable Retainer
HEADSET ASSEMBLY: OVER-THE-HEAD
To identify headset components, please refer to the above diagram key (1-12). For assembly instructions, please refer to the diagrams A-F on page 3.
Please note that the headset is supplied configured for right ear use. If this is how you wish to wear the headset refer to Fig A-C.
Fig A. Ensuring that the pivot pin holder on the headband is facing forwards, push the pivot pin on the receiver into the pivot pin holder.
Fig B. Press the headset cable into the cable stabiliser channel and then connect the headset cable to your telephone or amplifier.
Fig C. Adjust the headband length so the stabiliser bars rest gently above your ears. Then push the receiver close to your ear until it feels comfortable. Position the noise-cancelling microphone or voice tube towards your mouth. Adjust the position of the boom by either raising or lowering the boom or swivelling the headset forward and backwards from the pivot point. You are now ready to make and receive calls.
To convert to left ear use refer to Fig D-E.
Fig D. To convert the headset for left ear use, first pull out the front part of the boom (on noise-cancelling models) then rotate it downward so that it faces the opposite direction. Voice tubes should simply be rotated.
Fig E. Rotate the receiver downward in the opposite direction to the boom. The headset is now converted for left ear wear.
Fig F. Quick Disconnect™ Connector - This feature allows you to move away from the telephone wearing your headset without disconnecting your call. Before using your headset, join the connectors together. To move away from your desk, pull the connectors apart. To resume your call, reconnect.
Clothing Clip - The clothing clip helps to keep the headset free from the weight of the headset cable. Attach the clip to your clothing at a comfortable level.
HEADSET ASSEMBLY: OVER-THE-EAR
To identify headset components, please refer to the diagram key (1-12). For assembly instructions, please refer to the diagrams G-L on page 4.
Please note that the headset is supplied configured for right ear use. If this is how you wish to wear the headset refer to Fig G-I.
Fig G. Push the pivot pin on the receiver into the pivot pin holder on the earloop.
Fig H. Press the headset cable into the earloop cable retainer on the earloop and secure within the notches. Connect the headset cable to your telephone or amplifier.
Fig I. To position the headset move the earloop away from the receiver and place the earloop over your ear. Then push the receiver close to your ear until it feels comfortable. Position the noise-cancelling microphone or voice tube towards your mouth. Adjust the position of the boom by either raising or lowering the boom or swivelling the headset forward and backwards from the pivot point. You are now ready to make and receive calls.
To convert to left ear use refer to Fig J-K.
Fig J. To convert the headset for left ear use, first pull out the front part of the boom (on noise-cancelling models) then rotate it downward so that it faces the opposite direction. Voice tubes should simply be rotated.
Fig K. Rotate the receiver downward in the opposite direction to the boom. The headset is now configured for left ear wear.
Fig L. Quick Disconnect™ Connector - This feature allows you to move away from the telephone wearing your headset without disconnecting your call. Before using your headset, join the connectors together. To move away from your desk, pull the connectors apart. To resume your call, reconnect.
Clothing Clip - The clothing clip helps to keep the headset free from the weight of the headset cable. Attach the clip to your clothing at a comfortable level.
Replace the ear cushion every 6 months.
Replace the voice tube every 6 months.
Unplug the headset cable and clean both the cable and headset with a moist cloth once a month or when necessary.
PROBLEM
Callers cannot hear me.
Ensure that the boom is correctly positioned towards your mouth.
Check that the headset is correctly plugged into your telephone or amplifier.
For voice tube models, determine if the voice tube is blocked, by removing it and speaking into the silver tube.
If the caller can now hear you, simply replace the voice tube with a new one.
Plantronics recommends replacing the voice tube every 6 months.
PROBLEM
I cannot hear callers.
Ensure that the receiver is correctly positioned against your ear.
Check that the headset is correctly plugged into your telephone or amplifier.
Check that the Quick Disconnect™ is connected.
PROBLEM
The headband is uncomfortable.
Adjust the headband by lengthening or shortening the band ensuring the stabiliser bars rest gently above the ear.
PROBLEM
The earloop is uncomfortable.
Adjust the conformable earloop to suit your ear.
PARTS AND ACCESSORIES*
-
There are a range of Plantronics accessories and replacement parts for use with the DuoPro™ headset. The accessories allow you to convert the wearing style of your headset. For details, contact your supplier or local Plantronics office.
-
Optional accessories.
-
Earloop.

- Foam ear cushion.

- Headband.
- Voice Tube.

WARRANTY AND SERVICE
- Plantronics guarantees the satisfactory condition of the equipment with regard to manufacturing and material defects for 2 years from the date of purchase. (Please retain the original receipt).
- This product should be installed and used in accordance with the instructions detailed in this user guide, and serviced at an approved Plantronics Service Centre. Failure to comply with these conditions may render the warranty void.
This does not affect your statutory rights.
WILLKOMMEN
DuoPro™- Headset